### Propagation Techniques for Sato Cymbidium Orchids

Sato Cymbidium orchids, renowned for their exquisite blooms and vibrant colors, are a favorite among orchid enthusiasts and gardeners alike. Propagating these beautiful plants allows you to expand your collection, share them with friends, or even create a thriving business. In this article, we will explore the various propagation techniques for Sato Cymbidium orchids, detailing each method step by step, along with tips for successful propagation.
#### 1. Understanding Sato Cymbidium Orchids
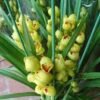
Before diving into propagation techniques, it’s essential to understand the characteristics of Sato Cymbidium orchids. These orchids belong to the genus *Cymbidium*, which is known for its lush foliage and long-lasting flowers. Sato Cymbidium orchids are distinguished by their compact growth habit and ability to thrive in various environments, making them a popular choice for both indoor and outdoor cultivation.
These orchids are typically characterized by:
– **Pseudobulbs**: Thickened stems that store nutrients and water, enabling the plant to survive periods of drought.
– **Linear Leaves**: Long, narrow leaves that grow from the base of the pseudobulbs, providing a lush, green backdrop for the flowers.
– **Inflorescences**: Long flower spikes that can produce multiple blooms, often in vibrant colors such as yellow, red, and pink.
Understanding these traits is crucial for successful propagation, as different methods may be more suitable depending on the plant’s health and growth stage.
#### 2. Choosing the Right Time for Propagation
The timing of propagation plays a vital role in the success of your efforts. For Sato Cymbidium orchids, the best time to propagate is after the flowering season, typically in late spring or early summer. During this period, the plant is actively growing and can recover more quickly from the stress of division or other propagation methods.
#### 3. Common Propagation Methods
Several methods can be employed to propagate Sato Cymbidium orchids. Each technique has its advantages and is suitable for different situations.
##### a. Division
**Overview**: Division is the most common method for propagating Sato Cymbidium orchids. It involves separating the plant into multiple sections, each with its own roots and pseudobulbs.
**Steps for Division**:
1. **Select a Healthy Plant**: Choose a mature Sato Cymbidium orchid that has several pseudobulbs and a healthy root system.
2. **Prepare Tools**: Gather the necessary tools, including sharp pruning shears or a knife, and ensure they are sterilized to prevent disease transmission.
3. **Remove the Orchid from the Pot**: Gently take the orchid out of its pot, being careful not to damage the roots.
4. **Examine the Root System**: Inspect the roots and pseudobulbs, looking for natural divisions where the plant can be split.
5. **Divide the Plant**: Using the sterilized tools, cut through the root system and pseudobulbs to create sections. Each division should have at least one healthy pseudobulb and several roots.
6. **Replant the Divisions**: Place each division into its own pot filled with fresh orchid potting mix, ensuring the roots are spread out and the pseudobulbs are above the soil level.
7. **Water and Care**: Water the newly potted divisions lightly and place them in a shaded area to recover for a few weeks before gradually introducing them to brighter light.
**Advantages of Division**:
– Rapid establishment of new plants.
– Each division is genetically identical to the parent plant.
**Considerations**:
– Ensure that the divisions have enough roots to sustain themselves after separation.
– Avoid dividing plants that are not healthy, as this may stress them further.
##### b. Back Bulb Propagation
**Overview**: Back bulb propagation involves using older, non-flowering pseudobulbs to create new plants. This method can be particularly effective if the back bulbs are healthy and have not deteriorated.
**Steps for Back Bulb Propagation**:
1. **Identify Healthy Back Bulbs**: Select mature back bulbs that are firm and healthy. Avoid bulbs that are soft, shriveled, or rotting.
2. **Remove the Back Bulbs**: Carefully cut the back bulbs from the parent plant using sterilized pruning shears.
3. **Prepare for Planting**: Allow the cut end of the back bulbs to callous over for a few days in a shaded, dry location to prevent rot.
4. **Planting**: Once the bulbs have calloused, plant them in small pots filled with well-draining orchid potting mix. Bury the bulbs just below the surface.
5. **Watering**: Lightly water the bulbs and place them in a warm, humid environment, such as a propagation chamber or greenhouse.
6. **Care for New Growth**: After a few weeks, new shoots may begin to emerge. Maintain high humidity and consistent moisture during this initial growth phase.
**Advantages of Back Bulb Propagation**:
– Utilizes parts of the plant that may otherwise be discarded.
– Can produce new plants from bulbs that would not otherwise bloom.
**Considerations**:
– Back bulbs may take longer to establish compared to divisions.
– Patience is necessary, as it can take several months for new growth to appear.
##### c. Keiki Propagation
**Overview**: Keikis are small plantlets that develop on the flower spikes of orchids. While more common in other orchid types, Sato Cymbidium orchids can occasionally produce keikis, which can be propagated.
**Steps for Keiki Propagation**:
1. **Identify Keikis**: Look for small plantlets growing along the flower spike of the parent plant.
2. **Wait for Roots**: Allow the keikis to develop roots. Wait until the roots are at least a few inches long before removing them.
3. **Remove the Keiki**: Gently cut the keiki from the flower spike using sterilized shears.
4. **Planting**: Plant the keiki in a small pot filled with orchid potting mix, ensuring that the roots are well covered.
5. **Water and Care**: Water lightly and place in a shaded area until the keiki establishes itself.
**Advantages of Keiki Propagation**:
– Allows for the creation of new plants from existing flower spikes.
– Keikis are genetically identical to the parent plant.
**Considerations**:
– Keikis are less common in Sato Cymbidium orchids compared to other orchid species.
– Care should be taken not to damage the flower spike when removing the keiki.
#### 4. Factors Affecting Successful Propagation
To ensure successful propagation of Sato Cymbidium orchids, several factors must be considered:
##### a. Environment
– **Light**: Provide bright, indirect light to encourage growth. Avoid direct sunlight, which can scorch young plants.
– **Temperature**: Maintain a temperature range of 65°F to 75°F (18°C to 24°C) during the day and slightly cooler at night for optimal growth.
– **Humidity**: High humidity levels (40-60%) are ideal for propagation. Consider using a humidifier or placing pots on trays filled with water and pebbles to increase humidity.
##### b. Potting Mix
– **Well-Draining Medium**: Use a high-quality orchid potting mix that promotes drainage. A mix containing bark, perlite, and sphagnum moss works well for Sato Cymbidium orchids.
– **Sterilization**: Ensure that the potting mix is sterilized to prevent disease and pests from affecting the young plants.
##### c. Watering Practices
– **Consistency**: Water newly propagated plants consistently, allowing the top inch of soil to dry out before rewatering.
– **Avoid Overwatering**: Overwatering can lead to root rot, so it’s crucial to strike a balance and monitor soil moisture regularly.
#### 5. Caring for Newly Propagated Plants
Once you have successfully propagated Sato Cymbidium orchids, ongoing care is essential for their growth and development:
##### a. Gradual Light Exposure
– After a few weeks, gradually acclimate the new plants to brighter light conditions. Start with filtered sunlight and slowly increase exposure to prevent shock.
##### b. Nutritional Support
– **Fertilization**: Once new growth appears, begin fertilizing with a balanced orchid fertilizer every 4-6 weeks to promote healthy growth.
– **Organic Options**: Consider using organic fertilizers, such as fish emulsion or seaweed extract, to provide a gentle nutrient boost.
##### c. Monitoring for Pests and Diseases
– **Regular Inspections**: Check for signs of pests, such as aphids, mealybugs, or scale. Early detection is key to preventing infestations.
– **Preventative Measures**: Keep the growing area clean and free of debris to reduce the risk of diseases.
#### 6. Conclusion
Propagation of Sato Cymbidium orchids is a rewarding and fulfilling endeavor that can enhance your gardening experience and expand your collection. Whether you choose to propagate through division, back bulbs, or keikis, understanding the techniques and factors involved will set you on the path to success.
By providing the right environment, proper care, and attention to detail, you can enjoy the beauty of these stunning orchids in your garden or share them with fellow enthusiasts. With patience and dedication, the propagation journey will lead to a thriving collection of Sato Cymbidium orchids, adding elegance and charm to your outdoor or indoor spaces.
### Advanced Techniques for Propagating Sato Cymbidium Orchids
In the first part of this article, we explored the fundamental methods of propagating Sato Cymbidium orchids, such as division, back bulb propagation, and keiki propagation. In this second part, we will delve deeper into advanced techniques for propagation, discussing specific methodologies, environmental considerations, and the science behind successful orchid breeding. By mastering these techniques, you can enhance your propagation success and ensure your Sato Cymbidium orchids flourish.
#### 1. The Science of Orchid Propagation
Understanding the biological processes behind orchid propagation is crucial for success. Orchids are unique in their reproductive systems and growth habits, which require specific conditions for effective propagation.
– **Meristematic Tissue**: At the core of many propagation methods is the meristem, a region of undifferentiated cells responsible for growth and regeneration. This tissue can be cultured to produce new plants, ensuring genetic consistency.
– **Photosynthesis and Growth**: Understanding how orchids photosynthesize can also help you create optimal growth conditions. Sato Cymbidium orchids require adequate light for photosynthesis, which is vital for energy production during the propagation phase.
– **Root Development**: Successful propagation hinges on strong root development. Roots are responsible for water and nutrient uptake; hence, proper care must be taken to encourage their growth during the propagation process.
#### 2. Advanced Propagation Techniques
Beyond the basic methods discussed earlier, several advanced techniques can be utilized for propagating Sato Cymbidium orchids:
##### a. Tissue Culture Propagation
**Overview**: Tissue culture is a sophisticated method of propagation that involves growing new plants from plant cells or tissues in a controlled environment.
**Steps for Tissue Culture**:
1. **Select Healthy Plant Material**: Choose healthy plant tissues, preferably meristematic tissue or young shoots.
2. **Preparation of Culture Medium**: Prepare a sterile culture medium with essential nutrients, hormones, and sugars. Commonly used media include Murashige and Skoog (MS) medium, which provides the necessary nutrients for orchid growth.
3. **Sterilization**: Sterilize the plant tissue and culture vessels to prevent contamination. This can be done using bleach solutions or alcohol wipes.
4. **Inoculation**: Place the sterilized tissue into the prepared culture medium under sterile conditions. This is typically done in a laminar flow hood to minimize contamination risk.
5. **Incubation**: Place the culture vessels in a controlled environment with the appropriate temperature, light, and humidity. Typically, a temperature of around 70°F to 80°F (21°C to 27°C) and a 16-hour photoperiod with fluorescent lighting work well for tissue culture.
6. **Subculturing**: As the plant tissues grow, they will require subculturing every few weeks to new media to ensure continued growth and avoid nutrient depletion.
7. **Acclimatization**: Once the plantlets have developed roots and are of adequate size, they can be removed from the culture medium and acclimatized to the outside environment. This involves gradually exposing them to lower humidity and higher light levels.
**Advantages of Tissue Culture**:
– High propagation efficiency, producing numerous plants from a small amount of tissue.
– Disease-free plants as the tissue can be sourced from healthy specimens.
– Potential for hybridization and the creation of new varieties.
**Considerations**:
– Requires a sterile environment and precise techniques, which may require specialized equipment and training.
– Time-consuming and labor-intensive compared to other methods.
##### b. Seed Propagation
**Overview**: Seed propagation is another method used to produce new Sato Cymbidium orchids. However, this technique is more complex due to the specific germination requirements of orchid seeds.
**Steps for Seed Propagation**:
1. **Collect Seeds**: Harvest seeds from a mature Sato Cymbidium flower once the seed pod has dried and turned brown.
2. **Sowing the Seeds**: Orchid seeds lack the necessary nutrients to germinate on their own. Therefore, they need to be sown on a sterile culture medium or used in conjunction with mycorrhizal fungi that assist in their growth.
3. **Controlled Environment**: Place the sowing medium in a controlled environment with high humidity (around 70-80%) and a warm temperature (around 75°F or 24°C).
4. **Light Conditions**: Provide bright, indirect light for optimal seed germination. Too much direct sunlight can damage the delicate seeds.
5. **Monitoring**: Keep the medium moist and monitor for signs of fungal growth or contamination. This stage can take several months as seeds develop into small seedlings.
**Advantages of Seed Propagation**:
– The potential to create unique hybrids and new varieties.
– Genetic diversity in the resulting plants.
**Considerations**:
– The process is lengthy and requires careful monitoring.
– Lower success rates compared to vegetative propagation methods.
– Seeds can take anywhere from six months to several years to mature into flowering plants.
##### c. Air Layering
**Overview**: Air layering is a method that encourages roots to form on a stem while still attached to the parent plant. This technique can be particularly effective for larger Sato Cymbidium orchids.
**Steps for Air Layering**:
1. **Select a Stem**: Choose a healthy stem from the parent plant that is at least a few inches long and has nodes where roots can develop.
2. **Wound the Stem**: Make a shallow cut (about one-third of the way through) around the stem below a node. This will stimulate root growth.
3. **Apply Hormones**: Optionally, apply rooting hormone to the wound to encourage root development.
4. **Wrap with Moist Medium**: Surround the wounded area with moist sphagnum moss or another suitable medium, and wrap it with plastic wrap to retain moisture.
5. **Secure the Wrap**: Use ties or tape to secure the plastic wrap in place, ensuring it remains tight and maintains humidity.
6. **Monitor**: Check the moisture level regularly and keep the environment warm and humid. Roots should begin to form within a few weeks.
7. **Sever and Pot**: Once sufficient roots have developed, cut the stem below the newly formed roots and pot it in orchid potting mix.
**Advantages of Air Layering**:
– Produces a new plant that is genetically identical to the parent plant.
– Maintains the parent plant’s health while propagating.
**Considerations**:
– The process can take several weeks to months for roots to develop.
– Requires patience and careful monitoring of moisture levels.
#### 3. Environmental Conditions for Successful Propagation
Regardless of the propagation technique employed, maintaining optimal environmental conditions is crucial for successful Sato Cymbidium orchid propagation.
##### a. Humidity
– **Ideal Levels**: Humidity levels between 50-70% are generally ideal for propagating orchids. Using humidity trays or misting can help achieve this.
– **Monitoring**: Consider investing in a hygrometer to monitor humidity levels accurately.
##### b. Temperature
– **Day/Night Variation**: Sato Cymbidium orchids benefit from a slight drop in temperature at night, simulating natural conditions. Maintaining daytime temperatures around 70°F to 80°F (21°C to 27°C) and nighttime temperatures around 60°F to 65°F (15°C to 18°C) can promote healthy growth.
– **Avoiding Extremes**: Protect newly propagated plants from extreme temperature fluctuations, drafts, and direct heat sources.
##### c. Light Requirements
– **Light Type**: Use fluorescent lights or LED grow lights to provide consistent light levels if growing indoors. Orchids generally prefer bright, indirect light.
– **Light Duration**: Aim for 12-16 hours of light per day, gradually increasing exposure as plants grow.
##### d. Air Circulation
– **Importance**: Good air circulation is essential to prevent mold and disease during propagation. Consider using small fans to improve airflow in growing areas.
– **Placement**: Avoid overcrowding your plants, as this can restrict airflow and create a humid environment conducive to fungal growth.
#### 4. Common Challenges in Orchid Propagation
While propagating Sato Cymbidium orchids can be rewarding, several challenges may arise. Understanding these potential issues and how to address them can improve your success rates.
##### a. Pests and Diseases
– **Identifying Issues**: Regularly inspect your plants for signs of pests such as aphids, spider mites, and mealybugs. Common diseases include root rot, fungal infections, and bacterial infections.
– **Management Strategies**: Use organic insecticides or neem oil for pest control, and ensure proper watering practices to prevent root rot.
##### b. Root Rot
– **Causes**: Overwatering and poor drainage are the primary causes of root rot in orchids.
– **Prevention**: Ensure pots have adequate drainage holes and use well-draining potting media. Allow the top layer of the medium to dry out between watering.
##### c. Low Success Rates
– **Problem**: Many propagation methods, particularly seed propagation, can have low success rates.
– **Solution**: Improving environmental conditions, using high-quality plant materials, and ensuring sterility can enhance your chances of success.
#### 5. Conclusion
Propagating Sato Cymbidium orchids requires a combination of knowledge, patience, and proper technique. By exploring advanced propagation methods such as tissue culture, seed propagation, and air layering, you can increase your success and expand your collection of these beautiful plants.
Understanding the scientific principles behind orchid propagation and maintaining optimal environmental conditions will help you overcome challenges and promote healthy growth. Whether you are a hobbyist looking to grow your collection or a professional breeder, mastering these propagation techniques will ensure your Sato Cymbidium orchids thrive and bloom beautifully for years to come.